Build and Run Testbench
First, you’ll need to install some dependencies to run the testbench:
sudo apt install valgrind bc # For Ubuntu/Debian
sudo dnf install valgrind bc # For Fedora
Retrieve the required firmware from the thesofproject repository in
Github as described in Build toolchains and SOF from sources. Start a shell at the
firmware repository top level in the $SOF_WORKSPACE/sof directory as also described.
cd "$SOF_WORKSPACE"/sof
Run the following scripts to build the test pipelines, build the testbench, and run the testbench with the provided quick check script:
./scripts/build-tools.sh -t
./scripts/rebuild-testbench.sh
./scripts/host-testbench.sh
The current version of host-testbench.sh outputs the following text if
the previous steps are successful:
==========================================================
test volume with ./volume_run.sh 16 16 48000 zeros_in.raw volume_out.raw
volume test passed!
volume_out size check passed!
==========================================================
test src with ./src_run.sh 32 32 44100 48000 zeros_in.raw src_out.raw
src test passed!
src_out size check passed!
==========================================================
test eqiir with ./eqiir_run.sh 16 16 48000 zeros_in.raw eqiir_out.raw
eqiir test passed!
eqiir_out size check passed!
Note that more items are slated to be tested in this check so the output will likely change. The testbench can be used for audio quality tests and debugging new components under development.
host-testbench.sh
In our example, the host-testbench.sh script shows that the IIR EQ test
is run with the following commands:
cd tools/test/audio
head -c 10240 < /dev/zero > zeros_in.raw
./eqiir_run.sh 16 16 48000 zeros_in.raw eqiir_out.raw
The directory that contains eqiir_run.sh is entered first. Next, a file
of 10240 bytes of zeros is created. As 16-bit data, it corresponds to 2560
frames of S16_LE format stereo frames (4 bytes per frame). At a 48 kHz rate,
it corresponds to 5.3 ms of audio stream. Audio test signals are usually
longer but this is sufficient for the quick testbench health check.
To process a music file with an under-development SOF component, a utility
to convert from wav, mp3, etc. to raw S16_LE/S24_LE/S32_LE format is needed.
The next command installs from the Ubuntu packages repository a lot of useful
tools for audio files converting, viewing, recording, playing, and editing.
FFMPEG can be used to import/export formats that the simpler tools sox
and ecasound do not support. The last three items are light audio
waveform viewers and players with some editing and mixing capabilities.
Also, digital audio workstation (DAW) software such as Ardour, Qtractor, and
MusE can be used but there’s more effort in using them for small quick tasks
such as in the following case.
sudo apt install alsa-utils pulseaudio-utils sox ecasound ffmpeg audacity snd-gtk-pulse mhwaveedit
A sample music or voice or test signal file is needed. The above alsa-utils package contains some wav files. The sound (and many other file types) characteristics can be easily checked using this file command:
$ file /usr/share/sounds/alsa/Front_Center.wav
/usr/share/sounds/alsa/Front_Center.wav: RIFF (little-endian) data, WAVE audio, Microsoft PCM, 16 bit, mono 48000 Hz
This file has the correct default 48 kHz rate and 16 bits samples but it is in a single channel format (mono). To fix it for testing, run the following example command. Sox automatically converts the sample format to stereo by duplicating the channels. Also the rate would be converted if the file would be 44100 Hz sampled.
sox /usr/share/sounds/alsa/Front_Center.wav --encoding signed-integer -L -r 48000 -c 2 -b 16 audio_in.raw
Now the testbench can be executed for the input file and the output can be converted back to wav format:
./eqiir_run.sh 16 16 48000 audio_in.raw audio_out.raw
sox --encoding signed-integer -L -r 48000 -c 2 -b 16 audio_out.raw audio_out.wav
The file can be played from the command line with the following command or it can be launched to an audio editor tool such as mhWaveEdit:
paplay audio_out.wav
mhWaveEdit audio_out.wav
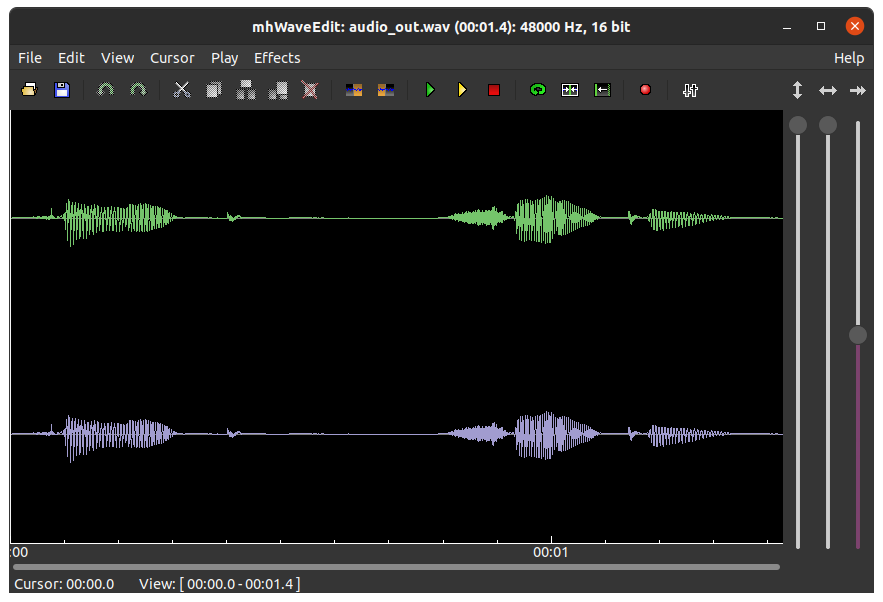
Figure 141 Viewing the result with mhWaveEdit
Select the green play icon to play the clip in the application. Use the mouse to zoom in on audio waveform details. Select the yellow play icon to play a selected area.